Showing posts with label projects. Show all posts

Wednesday, May 15, 2013

DIY Busy Board


For Cora's first birthday we decided our present to her would be a busy board. I had found multiple types of busy boards on pinterest- super cute, fun, and utterly entertaining for kiddos. I told matt about my grand idea to make Cora one...and off we went to Home Depot. We wanted to have a big board that was mounted on the wall at an appropriate cora-height. It was to have many gadgets on it... things that she finds already fascinating in real life. And as she gets taller- we just keep moving it up the wall or down for the next kiddo.


I'd like to tell you that this project was affordable and easy. But it wasn't. Matt thankfully had the skills to mount all of these crazy devices. But the gadgets and the wood- they added up real fast (ie. $100)! Perhaps if you used items from your home, or a recycled building materials store, or chose to make a smaller-scale busy board...this would be a thriftier DIY project. Alas. It was a fun project for us, and Cora loves it.

Steps:
1. Buy materials
We bought a piece of plywood 2' x 4' for the board itself then some 2" x 2" to make a frame. Next we roamed around each aisle looking for fun gadgets. We also bought some spray polyurethane and I had acrylics at home already. This is what we came up with:


- master lock with key
- combination lock
- gate latches

- door chain

- PVC caps to screw on and off


- tap lights
- door stopper thing

- light switch
- chain links with a carabiner

- pulley with a rope
- a random knob
- door knob (found at a local re-use store. I only needed half of the knob with the locking part...so it was perfect and under $1)
- a few eye hole screws and U-bolts
- a garden faucet knob (not pictured here... but red, and fun)


- two doors made from scrap wood we had: each with pictures of our dogs behind them
- hinges for the doors

2. We laid out the gadgets together on the blank board, to see what looked best for ease of her "working" and visual appeal. Then traced out where each went with pencil.


3.  Matt pre-drilled holes in the busy board for each gadget and sanded it. This took him a ton of time. He also had to cut down metal things- like the eye-hole screws or back of the door knob- they would have protruded through our living room wall (not okay).


4. We came up with a design to paint it. We love the look of real wood... so we went with a subtle herringbone in some fun colors we were okay with having on our living room wall. This design we blue-painter-taped out, then randomly painted with acrylics. Matt & I each took a color and painted some random diagonals...and then we went to the next colors. So. much. fun.


5. Then spray- polyurethaned the board and doors. And let it dry for a day.


oh hi cora. you're right, maybe I should stop taking photos from scary places... pregnant.

6. Matt started to install all of the contraptions at this point. Lots of screwing & gluing I tell you.

7. Make the mounting frame with the 2" x 2" frame, then glued it on the back of the busy board. Matt clamped it and let it dry.

8. Mount the board to the wall with some HUGE screws.


9. Then you're ready for the big reveal! Cora's favorite item on the board - the lock and key. Crazy. She almost has it down. Also our dogs hiding behind the doors- super fun for her.


Hindsight:
- I wish that we had rigged the light switch to turn on a little light bulb on the busy board. Matt is handy...but not an electrician. This would have taken some more google searches and even more effort. However, sweet little cora, each time she turns on the "light switch" she looks around to see which light in the house turned off or on. It breaks my heart. That girl is so smart, and I am ruining her world of light switch's cause and effect. Next time. Ha.
- I wish we had put two hinges on each door. It would have been sturdier for all of the tugging. It's okay...so far.
- I wish we had looked longer for unique latches. As it was we spent a lot of time and money on the project, so it wasn't really feasible in our minds. But it would be fun to have some crazy fun contraptions from antique stores, etc. on there. Can I mention I was in my first trimester-hangover at this point too? Yeah. Home Depot made it easier and done in one shot...so I have to give myself a break on this one.

Wednesday, November 14, 2012

pretend food.

[all found on etsy category: play food... of course]
 
I have to say... play food has become incredible little pieces of art. Oh. my. gosh. I remember back in the day my sister and I used to make play food. That consisted of green paper punches to simulate peas... yellow circle on white splotches for eggs... you know. I thought that was creative, but gosh...look at these beauties! Sure our mom used to make us fun little clay foods...and tiny tea party cakes that were beautiful... and she was even awesome enough to make us a pretend turd for our baby doll diapers- talk about a cool mom! We also had the pretend plastic food- that was fun too, but rather limited 25 years ago in comparison to what Cora will have available.

...pretend food?!
 
Now I am dreaming up making play food for little Cora. She doesn't even know what lies ahead for her little childhood that I am scheming. I have to make it durable and realistic. I can check pretend potatoes off the list- I know how to make those now! Anyways, I can't wait. And I just hope Matt and I will whip up a pretend kitchen too for her. so. much. fun.

Wednesday, October 31, 2012

sack-o-spuds


Happy Halloween!
 
This was Cora's first halloween, so... of course she had to be a homegrown sack-o-spuds. You might have seen it on pinterest (I pinned it back when I was pregnant). It was a must do for our little idaho spud.

 
Pretty simple costume...
  • Make a few spuds- This is how you make a panty-hose spud...with eyes! So fun.

  • The body is just natural canvas that I had lying around from our wedding tablecloths.

  • Draw some brown lettering on the sack with brown sharpie (hers said- homegrown spud pacotti farms idaho est. 2012)
  • Then a brown outfit underneath
  • An adult brown headband, sewed down to size with a spud sewn to it.

Ta-da! Homegrown Spud!
She is no sack of potatoes though, I assure you. She is more like a wiggle worm- but that costume would have taken me a bit longer to make.


We thought her outfit was hilarious.... she tolerated it surprisingly well too! I guess bring on the headbands with big flowers. Little spud is down. I also had a blast making it... no wonder so many moms make halloween costumes. Totally fun first halloween!

Thursday, October 11, 2012

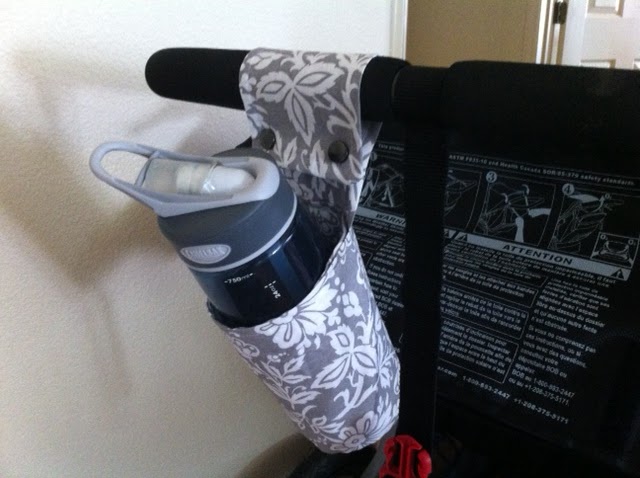
DIY jogger drink holder!


I am on a crafty roll. Nap time today I made a DIY jogger drink holder! It's awesome. It's not perfect. But I love it so much I am going to try it out when little miss wakes up. I try to go for a walk with cora in our lovely Bob stroller once a day. It doesn't always happen, but I try to. I usually bring my coffee (or water if I am feeling uber healthy). I always want to place it in a cup holder for when we go up and down curbs. Ta da! DIY stroller drink holder.

I had a blast making this. I have never done the snap-thing. It was really fun, and looks great. This now opens up a whole new world of crafty things to make.

[sew can do's DIY cup holder...so cute!]

I used this tutorial from sew can do. Super easy. She made it out of laminated cotton- great idea, but I didn't have any today.
[yup, water bottle fits!]

I traced the top of my travel coffee mug that I often walk with... make two circles. Then cut out two 12"x7" rectangles. And one 10"x7" rectangle for the handle piece. Do some fancy circle-side-sewing...and place some snaps.... sew on the handle piece- done! You'll have to read her tutorial. I can't do this project justice, and she had a beautiful way of explaining it with pictures.


I made mine out of cotton... but next time I will reinforce the handle piece with an additional layer sandwiched in between. One of the snaps wants to pull out of the fabric when I go to open the snap- sucky. So I will probably have to remake it sometime.

Wednesday, October 3, 2012

pinterest wednesday!

 
Well, I have had some time to pinterest-around. Little sunshine (aka cora) naps pretty well and sleeps through the night for now- which means I have some free time on my hands! I have been dreaming of what I can do with Cora when she is a big girl. Oh, I can't wait for the craft time we can share. So much fun! But for now I do the crafts for her.

So I jumped on a pinterest find.... taggy blanket. Cora loves tags on all things. They are silky, smooth...and unfortunately, I think, rather ugly. Initially I cut the tags off of all things cora-bound. I love using my seam ripper to take all of those tacky labels off of Cora's toys and clothes. Whoops. She loves them. Bad mommy. So, in lieu of her tag obsession I made a taggy blanket last night. She also loves sucking on wash cloths- like in the bath, or burp rags....so what a perfect combo- I think.


I had some left over flannel fabric from her fitted sheet project and some fleece laying around. I bought $14 worth of ribbon- what a rip off. Anyways. The ribbon is turquoise... and green... and it makes me happy. I sewed it all together- first sewing it improperly- so I re-did it....and voila! A tiny pretty taggy blanket, that happens to match her room. She likes it so far, but we shall see if it lasts.


Next on my craft-to-do list:
- artwork for Cora's plain-o room. yet to be determined, but pinterest will definitely be involved.
- fall wreath for our front door...yay... i love the holiday season!
- recruit matt to help with a "busy board" from above
- ribbon octopus to keep cora's toys from hitting the ground when we go out to eat

Monday, September 24, 2012

oh crafts.


Guess who is crafting?! It's me. Craaazy. I thought this day was a million years away. When would I have enough time to get back to being crafty?! Well, that day has come....and in the form of fitted crib sheets. Yes, I may be sewing in my bedroom on a collapsible table so that Cora can sleep peacefully across the house. And yes...I may be staring constantly at the little green light on the monitor. But it happened. And it was glorious.


Project: 2 flannel fitted crib sheets
Estimated time to complete: 2 nap times
Materials:
      2 yards flannel fabric per sheet
      3/4" wide elastic - 4' per sheet
Outcome: 2 adorably soft and more importantly completed fitted sheets

Yes, I have made DIY fitted sheets before with my mom when I was pregnant [back here]. I used an amy butler twin sheet to make two fitted crib sheets back then. They have held up really well too! Well now it's fall and cora needs a cozy little flannel fitted sheet to lay her head on. She sleeps through the night (hooray!!) and we are in the process of de-swaddling her. She flips over to her tummy each night, and nuzzles her little head into the sheet...so it's got to be cozy.

I used Dana Made It as a reference for my first fitted sheet project, and Prudent Baby as a reference for this project. I made my own dimensions that I thought would work well. Their explanations may make more sense...but I will try to explain my method.

[these are my two fabric choices to match her turquoise themed room]

I went to the quilt store and bought 2 yards each of super cute material. This wasn't cheap. But it was the colors I was looking for. I had my dimensions from the last time I did this project, but I wanted to do the elastic a little bit differently. I chose to sew the elastic onto the fabric, instead of making a casing for it. I thought it would take less time, maybe look less polished.... but I also hate, ok strongly dislike, threading elastic through casing. It frustrates me. So, I chose a new method.


My steps for a standard 52" x 28" x 5" crib mattress:

1. Cut out a 68" x44" rectangle from material. My material ended up being 43" wide... but it was just fine.

2. Then cut an 8" square from each corner.

3. Sew those two remaining edges of the square together inside out....at each corner. This makes the corners of the fitted sheet that will go down the side of the crib mattress and under.


4. Sew a hem around the whole edge of the sheet. Did I wash the fabric before sewing? No. Was mine perfect? No. Did I cut off the selvage? Um. No. Could I have spent more time with this making a more refined double hem? Yes. But did I mention I got this project done in 2 naps?! Amazing.

5. Anyways, cut four 12" lengths of 3/4" elastic.


6. Mark a half-way point on the elastic at 6".


7. Sew that half way mark at each of the corner's seams with a zig zag stitch.


8. Start sewing half of the elastic length starting at the center with stretching out the elastic as much as possible, zig zag stitch.

9. Sew the other half starting from the center line again and going out holding the elastic stretched out....zig zag it up.


10. When you let go you have a scrunched up corner! Yay!...Now keep going for each corner. Not bad, right?!

[our new house with a new spud room... lacking a little luster... so I need to pinterest some decor ideas and craft some more I suppose]

[she, however, does not lack luster.... not ever]
 
oh, toes.


11. Test it out... perfect!

Verdict on elastic techniques: It took close to as long sewing a casing and threading through the elastic as it did to pull the elastic taut and sew down. It does look a little worse than the casing- in case you cared what the bottom of the mattress looks like (I don't). Is the sheet as taut with just the corners having elastic as elastic the full length of the sheet?! Not really. If you tuck under the edges, it looks/acts the same. I think depending on my mood with elastic I could go either route- I think both are comparable.